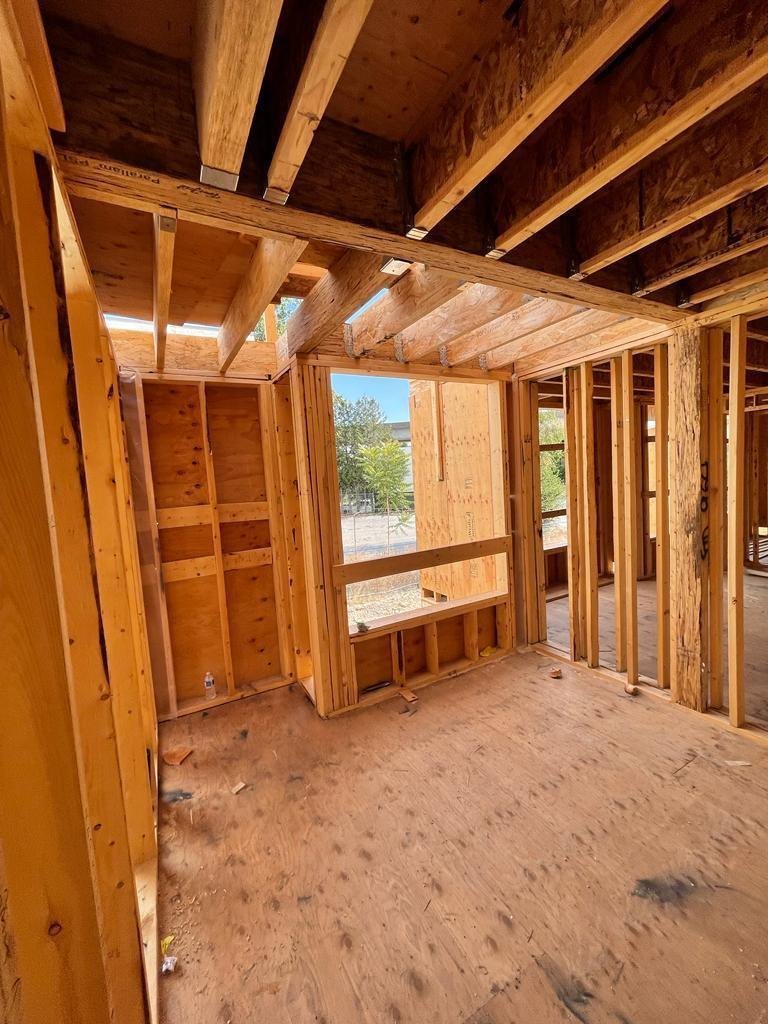
What a framing package covers
Residential framing turns the structural design into a connected wood skeleton that can carry gravity and lateral forces to the foundation. Depending on the agreement, a framing package may include wall, floor and roof framing, engineered components, sheathing, hardware, blocking and temporary bracing. The phrase “framing included” is too broad to compare bids by itself. A useful scope identifies each level, structure type, material supply, installation, equipment, waste handling, weather protection, inspection coordination and the party responsible for each interface.
The building designer and structural professional establish the design. The framing contractor reviews the information for buildability, plans labour and material coordination, and installs work to the approved documents. That division matters: a framing crew should not silently substitute a member size, remove a post, relocate a shear wall or reinterpret a detail because an on-site change appears convenient. Record questions, route them to the design team, and install a changed detail only after the required approval is documented.
A complete early conversation also names exclusions. Foundation design, excavation, concrete, building envelope, windows, roofing, mechanical work, electrical work and finish carpentry may be separate scopes. If one trade leaves an opening, edge, backing condition or temporary support for another, assign the handoff. Clear scope reduces missed work and gives the owner, builder and trades a common reference when the schedule changes.
Read the drawings before choosing a system
Begin with the site plan, architectural floor plans, elevations, building sections, structural notes and any engineering schedules. Confirm the drawing revision and the date of the approved set. Plans answer different questions: architectural sheets explain room layout and openings; structural sheets explain the intended load path, member design, connections and lateral system; truss and engineered-product shop drawings add component-specific fabrication information. A takeoff made from an outdated or incomplete set can miss scope or price the wrong assembly.
Mark the building footprint, floor levels, bearing lines, stair and service openings, cantilevers, roof geometry and locations where loads stack. Compare architectural openings with structural headers and posts. Check that the framing layouts have enough information to set joist direction and bearing, that the truss package is coordinated with the roof plan, and that mechanical routes do not collide with beams or webs. Write questions down as a short, numbered request for information rather than relying on a verbal memory.
For a Surrey infill or redevelopment parcel, drawing review connects to site constraints as well as the house plan. Lot grading, setbacks, easements, retaining conditions, servicing, protected trees and site access can affect where equipment, material and temporary bracing can go. The City directs applicants to check parcel conditions and applicable requirements before building; its requirements depend on the address and proposal.
Understand the continuous load path
A load path is the connected route that transfers forces through the building. Roof loads travel through rafters or trusses to bearing walls, beams, posts and foundations. Floor loads move through sheathing and joists into beams or walls below. The foundation then transfers the building loads to the supporting ground. Lateral forces from wind or earthquake action are resisted through the designed diaphragms, shear walls, collectors, connections and anchorage. Each connection is part of a system; a strong-looking member is not enough if its support or fastening detail is missing.
At each level, compare bearing walls and point loads with the structure below. A concentrated truss reaction or beam end may require a post, built-up stud pack, transfer element or foundation support shown by the designer. Offsets can be intentional, but they need a designed transfer path. Do not cut, notch, drill or relocate structural components outside their allowed details. If a conflict appears, stop that portion and ask the designer or engineer for a reviewed solution before covering the work.
During installation, the crew can help preserve design intent by checking layout marks, material identification, connection hardware, fastener types and installation sequences against current sheets. Hold-downs, straps, anchors, blocking and panel edges can become difficult to inspect after later trades work. Photographing concealed conditions and keeping the approved revision available supports closeout, but photographs do not replace required municipal inspection or professional field review.
Choose a floor system from the spans and coordination needs
Common residential floors use dimensional lumber joists, engineered I-joists, open-web floor trusses, beams or combinations selected by the design team. The decision depends on spans, loads, vibration criteria, floor depth, concentrated loads, service routes, fire and sound requirements, supplier availability and erection sequence. A deeper member is not automatically better: it may affect stairs, ceiling heights, mechanical routes, exterior elevations and the bearing condition at a wall. Keep those dimensions coordinated before the floor package is released.
I-joists can provide a predictable engineered product and web zones for services, but their flanges and webs have specific handling and opening rules. Open-web floor trusses can create service space through the web design and can reduce some site conflicts, while requiring accurate layout, bracing and coordination with the manufacturer’s drawings. Solid-sawn joists may suit a straightforward layout, subject to design and material grades. Beams and posts often support discontinuous or concentrated loads and require carefully coordinated bearing and connection details.
Before a floor is closed, confirm the joist direction, rim or band details, blocking, squash blocks where specified, stair openings, point-load transfer, subfloor adhesive and fastening pattern, and any cantilever or balcony connection. Verify holes and notches against the product literature and approved plan. Trade penetrations should be coordinated early; a field-cut hole through a flange or a beam can compromise the product and trigger redesign.
Lay out walls, bearing lines and openings
Wall layout begins with control lines and reference dimensions from the approved plan. The crew checks exterior dimensions, interior partitions, openings, wall intersections, stair locations and vertical alignment across floors. Load-bearing walls, braced or shear walls and non-structural partitions serve different purposes. Their labels, sheathing, fastening, anchorage and continuity should follow the structural documents. Moving a partition may appear cosmetic but can change support, fire separation, services or spatial-separation details, so changes still need review by the responsible design professional.
Window and door rough openings depend on the selected unit, installation details and drawings. Confirm manufacturer dimensions, rough-opening tolerances, sill heights, header depth, king and jack stud layout, hold-downs, backing, flashing transitions and clearance to adjacent structure. Where a wall carries load, a header transfers that load around the opening to its supports. Its capacity depends on span, tributary loading, bearing, material, restraint and connections, among other factors. A generic chart taken from another house cannot establish the right header for a particular opening.
Engineered wood products such as laminated veneer lumber (LVL), parallel-strand lumber, I-joists and glued-laminated timber (glulam) are manufactured to defined product properties. They can help solve spans or concentrated loads, but each product has its own design values, moisture limits, bearing rules, connection details and installation instructions. Keep tags and product identification where required, protect materials from prolonged wetting, and do not mix product assumptions when a plan names a specific system.
Compare site-built framing and prefabricated roof trusses
Site-built rafters and conventional framing offer flexibility where roof geometry, field conditions or design details call for individual members assembled on site. Prefabricated trusses are engineered assemblies made to a coordinated layout. They can support repeatable geometry and efficient erection, and the manufacturer’s truss placement plan and individual design drawings tell the installer where each truss belongs and how it must be braced and connected. The right choice depends on the building design, spans, roof form, ceiling requirements, access, supplier lead time and project sequencing.
A truss package should be coordinated with bearing locations, girder trusses, girder reactions, point loads, overbuilds, attic access, mechanical equipment and the roof sheathing pattern. Before setting, confirm piece marks, orientation, temporary and permanent bracing requirements, bearing, connectors and lifting method. Trusses are not designed for arbitrary site alterations. Cutting, drilling, removing webs or changing a connector can invalidate the design; obtain a sealed repair or revised detail through the manufacturer and responsible professional before proceeding.
A roof framing plan also coordinates overhangs, porch roofs, valleys, hips, skylights, ventilation paths and loads at transitions. Weather can affect erection and sheathing windows, while long trusses require a clear delivery route and safe staging area. The builder, truss supplier, crane operator and framing crew should agree on access, pick sequence and temporary stability before delivery so materials spend less time exposed and the structure remains controlled while incomplete.
Manage rain and moisture during construction
Metro Vancouver’s wet season makes sequencing and temporary protection practical concerns. Wood framing should be stored off the ground, supported to limit distortion and protected from prolonged exposure while allowing reasonable ventilation. Remove standing water and correct obvious drainage problems. If material becomes wet, the project team should assess the product instructions, actual moisture condition, drying time and enclosure schedule rather than assuming a particular calendar interval makes it safe to close in.
The exterior wall’s water-control strategy is a designed assembly. A weather-resistive barrier, commonly called a WRB, is one part of a system that also includes cladding, a drainage space where required, flashing, window and door interfaces, penetrations, transitions and a path for water to drain outward. Products such as spun-bonded housewrap and self-adhered membrane have distinct substrate, lap, primer, temperature and compatibility requirements. Name-brand materials are not interchangeable instructions. Follow the approved details and current manufacturer installation guide for the specified assembly.
Window openings and wall penetrations deserve careful sequencing because small discontinuities can direct water into the wall. Confirm sill-pan and head-flashing details, shingle-style laps, corners, service penetrations and transitions to decks, roofs and foundations. Do not cover a questionable detail simply to keep pace. Raise it while access remains available, document the approved correction, and coordinate with the building-envelope designer when the repair changes the intended drainage plane.
Coordinate materials, delivery and site safety
An accurate material plan connects takeoff quantities to product grades, lengths, engineered shop drawings, fasteners and delivery timing. Separate structural members from non-structural blocking, preserve product labels and confirm substitutions before ordering. Long-lead items, engineered beams, trusses and specialty hardware may have different release and review cycles. A material schedule helps the builder compare what has been ordered with what is on site, spot missing connectors before an install day and reduce the chance that crews improvise a replacement under schedule pressure.
Delivery planning should account for truck access, overhead lines, turning space, crane reach where applicable, pedestrian access and neighbouring properties. Keep public sidewalks and roads clear, use the approved staging area, and plan where packages can remain level and protected. A compact Surrey lot may need staggered drops or just-in-time delivery. The site plan and actual conditions should determine the method; a generic logistics assumption can block another trade or put materials where they cannot be safely moved.
Framing work involves falls, lifting, saws, temporary openings and incomplete structures. The project’s safety plan, applicable occupational-health requirements, fall protection, equipment inspections and competent supervision govern the work. Temporary bracing keeps walls and trusses stable until the permanent sheathing, diaphragms and connections are installed. Never treat a partially framed building as stable merely because it has stood through one shift; maintain bracing as the erection plan and site conditions require.
Code scope and professional design
British Columbia’s 2024 Building Code took effect for permit applications starting 8 March 2024, with specific published transition rules and later revisions. Always identify the code edition applicable to the permit and check the province’s current revisions, errata and bulletins. The province maintains distinct code paths and requirements; a web article is not a substitute for the code text, approved permit documents or advice from the professional responsible for a design.
Part 9 applies to qualifying smaller buildings within its scope; other buildings are designed under other code provisions. Storeys, building area, occupancy, fire protection, structural system and other conditions can change the applicable route. It is not possible to determine the code path from the phrase “wood-frame house” alone. Surrey’s own permit pages identify drawing, professional and submission requirements that depend on the application and parcel.
Member sizing, bracing, lateral design, connections and seismic resistance depend on site and building-specific inputs. Avoid generic Lower Mainland “Zone 4/5” tables: code design uses the applicable edition, geographic hazard values, site class, building characteristics and required professional design. If a permit calls for sealed structural documents or field review, the registered professional defines those responsibilities. A contractor can install to those documents and flag conflicts; a contractor should not replace the professional design.
Local coordination across Surrey
Moonlite has confirmed service across Cloverdale, Fleetwood, Guildford, Newton, Whalley and South Surrey. Those areas include different lot patterns, street access, subdivision conditions and surrounding uses, so the site address and drawings matter more than a neighbourhood label. The same company scope may need different delivery planning for a tight infill lot than for a new subdivision with established staging and servicing conditions.
Before estimating, identify the civic address, whether the project is new construction or an addition, the approximate floor area, storey count, structural system named on the drawings, current permit stage, available drawing revisions, site constraints and preferred start window. Mention whether access, crane placement, excavation, concrete, trusses or engineered-product packages are included in the request. Avoid sending title records or other sensitive documents through a public form; send only the project material needed for an initial review.
Surrey’s zoning information is parcel-specific under Zoning Bylaw 12000. A label such as “residential” does not establish permitted use, setbacks, height, density or servicing. Confirm the parcel through City resources and the design team. If a variance, development permit, environmental condition or engineering service requirement applies, it can affect drawings and sequence before framing begins.
A practical pre-frame quality review
Before sheathing or later trades conceal framing, compare the installed work against the approved current drawing set. Check overall dimensions, openings, bearing, beams, posts, hangers, straps, hold-downs, blocking, sheathing edges and specified fasteners. The review should note discrepancies and route design questions to the responsible person. A checklist cannot certify structural compliance, but it can make routine coordination visible and give the team a consistent way to resolve small issues before they become concealed work.
Look for unfinished interfaces: stairs and landings, balcony ledgers, deck connections, roof-to-wall transitions, mechanical chases, fire blocks, backing for fixtures and edge support at sheathing. Confirm that temporary bracing can remain until the permanent system is complete. If a drawing revision changes one area, check whether connected details elsewhere also change. Keep superseded sheets clearly marked so an old detail is not accidentally used by a crew or delivery team.
Municipal inspections and professional field reviews are separate processes with different purposes. The permit identifies required inspections and the City’s current booking guidance tells the applicant what must be ready. A passed inspection does not authorize unrelated deviations from the approved design, and a contractor photo record does not replace either approval. Confirm required trade inspections and prerequisites before calling for a frame inspection.
Request a useful framing estimate
For an estimate conversation, send the drawing set and identify which sheets are current. State the location, building type, number of levels, approximate area, framing system, schedule assumptions and whether labour, material, equipment, trusses, engineered members, sheathing, blocking, site cleanup or temporary weather protection belong in the requested scope. If plans are preliminary, label them that way. A preliminary discussion can identify missing information, but it is not a fixed price until the scope and assumptions are agreed.
Ask each bidder to list included and excluded tasks, material responsibility, product assumptions, quote validity, allowance treatment, payment milestones, change-order process, inspection coordination, schedule dependencies and closeout documents. Compare bids against the same drawing revision and scope. A low number can exclude critical supply or handling tasks; a higher figure can include a different system or risk allowance. The scope schedule is what makes the comparison meaningful.
For a project-specific conversation with Moonlite, use the estimate form and include the location, build type, drawing stage, target start window and best way to follow up. The estimator worksheet on this site is only arithmetic based on values you enter from your own quote or planning assumptions; it does not supply a Moonlite rate or predict a construction cost.
Questions homeowners and builders commonly ask
Can a crew choose a larger header when an opening changes? The opening and its loads must be reviewed against the structural design. A bigger-looking member can still have inadequate bearing, connection or support below. Ask the engineer or designer for a revised detail before changing the frame.
Are roof trusses always faster than stick framing? Not always. Trusses can help with repeatable layouts and spans, but design coordination, shop-drawing approval, lead time, delivery access, crane availability and bracing affect the schedule. Complex roof geometry or site conditions may change the comparison.
Can framing continue before the permit is issued? Permit requirements and project conditions govern. Surrey says a permit is issued after requirements and fees are met; confirm the approved scope and permit conditions before starting regulated work. Do not rely on a contractor's general schedule as permission to build.
Does this guide replace engineering or a permit review? No. It explains common framing concepts only. The current applicable BCBC, approved permit set, manufacturer instructions and advice from registered professionals govern the project.
Moonlite works in framing and contracting. This guide is general information for owners, builders and project teams; it is not engineering, code-compliance, legal or permitting advice. Verify project decisions with the current authority, approved documents and qualified professionals.
Source review date: · How we prepare these guides